
Type any text. Press Play. Hear perfect Morse code.
Real-time synthesis • WAV download • Advanced timing • No account required
| # Dits | Length (ms) | |
|---|---|---|
| Dit length | 1 | 109 |
| Dah length | 3 | 327 |
| Intra‑character space | 1 | 109 |
| Inter‑character space | 3 | 327 |
| Word space | 7 | 764 |
The InMorseCode CW Generator is a free, browser-based Morse code audio synthesiser. You type any text into the input box, configure your speed and pitch settings, then press Play to hear your text rendered as real Morse code in real time — no downloads, no plugins, no account.
Unlike simple tone players that only play pre-recorded clips, this tool synthesises every dit and dah mathematically using the Web Audio API. That means the timing is perfectly accurate to the ITU standard, and every setting you change — WPM, pitch, gaps — is applied instantly.
Who is this tool for?
Beginners learning Morse code for the first time will use it to hear how letters and words sound. Intermediate learners use it to create custom practice audio. Advanced operators use the Farnsworth and Wordsworth timing controls and WAV export to build full training sessions. It is also used by radio clubs, Elmer coaches, and exam candidates.
You can hear your first Morse code in under 30 seconds. Here is exactly what to do:
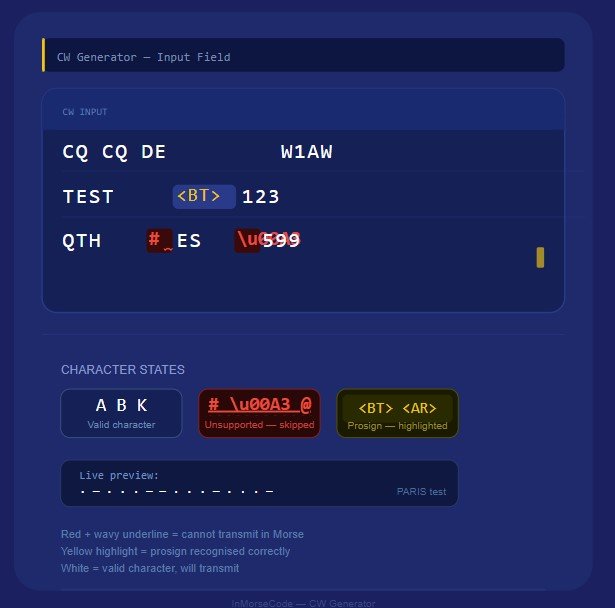
Click inside the dark blue text area at the top of the tool. It shows example text by default: ‘CQ CQ DE CALL <BT> TEST 123’. Delete it and type whatever you want to hear in Morse — a callsign, your name, the letters of the alphabet, or a full sentence. Upper and lower case both work. As you type, any unsupported characters are highlighted in red so you know immediately if something cannot be transmitted.
The tool defaults to 20 WPM — a comfortable intermediate speed. If you are a complete beginner, open the Configure panel (click the grey Configure button) and set Character speed to 20 and Farnsworth speed to 5. This gives you fast characters with generous gaps between them. If you just want to hear what it sounds like at the default setting, you can skip this step entirely and come back to it later.
Click the blue Play button. Your browser activates the audio engine and you will immediately hear Morse code. The status changes to playing. Press Space on your keyboard to pause at any time, and Space again to resume. Press Stop to reset and start again from the beginning. That is all there is to basic operation.
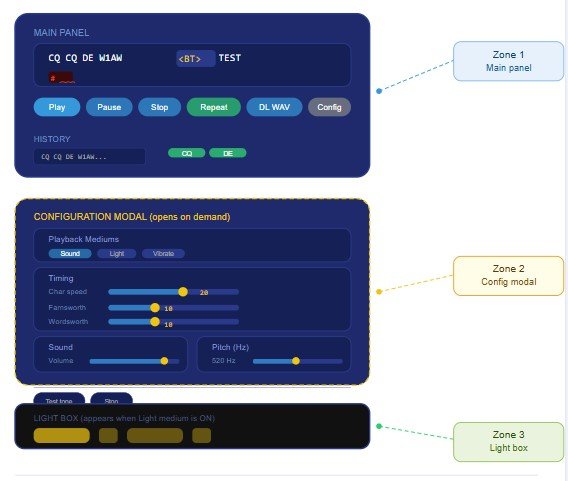
Zone | What is here |
Main Panel (dark blue) | The text input box, all six main buttons (Play, Pause, Stop, Repeat, Download WAV, Configure), and the History section. This is where you spend 90% of your time. |
Configuration Modal | A pop-up panel that opens when you click Configure. Contains all speed, pitch, and output settings. Close it when done — your settings are saved automatically. |
Light Box (black strip) | A black strip that appears below the main panel when you enable the Light output medium. It flashes yellow with every dit and dah, providing a visual alternative to audio. |
The large dark blue text box at the top of the tool is the CW Input. Everything you type here will be converted to Morse code when you press Play.
What you can type
Click the Configure button to open the settings modal. It is divided into two main sections: Timing and Sound. You do not need to touch these controls to use the tool — but mastering them will make your practice dramatically more effective.
At the top of the Configuration modal are three toggle buttons that control how the Morse is delivered. Each can be switched on or off independently. At least one should always be active.
Icon | Medium — what it does and when to use it |
🔊 | 🔊 Sound (default ON) The classic audio Morse. A sine-wave tone plays for each dit and dah. This is what you hear through your speakers or headphones. All pitch and volume settings in the Sound section apply to this. Beginner: keep this ON always. |
💡 | 💡 Light Activates the Light Box — the black strip below the tool. It flashes yellow with each dit and dah in perfect sync with the audio. Use this alongside Sound to train visual recognition, or alone for silent visual-only practice. When you toggle Light ON, the black strip becomes visible immediately. |
📳 | 📳 Vibrate On supported Android devices and some tablets, the device vibrates for each dit and dah. This provides a tactile way to feel the rhythm of Morse code. The vibration duration matches the dit or dah length exactly. Not available on iOS or desktop computers. |
This is the most important section for building real CW skill. Three sliders control different aspects of the timing. Understanding how they interact is the key to using this tool effectively.
This slider controls the speed of the dots and dashes inside every individual letter. At 20 WPM, one dot lasts approximately 60 milliseconds. At 10 WPM, it lasts 120 milliseconds. Character speed determines the acoustic ‘shape’ of each letter — the unique rhythm signature your brain must learn to recognise.
! Critical rule for all beginners |
Set Character Speed to 20 WPM from day one and never lower it. A letter practised at 8 WPM sounds completely different from the same letter at 20 WPM — you will have to unlearn it. High character speed trains your brain to recognise letters as sounds, not as counted dits and dahs. |
This slider controls the spacing between individual letters within a word. Setting it lower than Character Speed inserts extra silence between letters — this is the Farnsworth technique, the most rigorously tested method for learning CW.
With Character Speed at 20 and Farnsworth Speed at 5, each letter is sent fast but the gaps between letters are stretched to 5 WPM spacing. You hear crisp, fast, authentic letter shapes but have generous time to identify each one before the next arrives.
As your recognition speed improves, increase Farnsworth Speed by 1–2 points each week. When it reaches the same value as Character Speed, you are reading at full character-speed — that is your effective WPM.
This slider controls the pause between complete words. It works identically to Farnsworth but applies at the word boundary rather than the character boundary. As a beginner, set this to the same value as Farnsworth Speed. Advanced operators sometimes set word spacing independently to simulate different operating styles.
A dropdown with two options:
Below the sliders is a table showing exactly what your speed settings mean in milliseconds. This updates live as you move the sliders.
Element | # Dits | Meaning in milliseconds |
Dit length | 1 dit | The duration of a single dot. At 20 WPM this is approximately 60 ms. |
Dah length | 3 dits | A dash is always exactly 3 times the dit length. |
Intra-char space | 1 dit | The gap between elements within a single letter (e.g. the gap inside the letter A between its dot and dash). |
Inter-char space | 3 dits | The gap between letters within a word. The Farnsworth slider extends this. |
Word space | 7 dits | The gap between complete words. The Wordsworth slider extends this. |
The Effective speed line below the table tells you the real-world WPM that an experienced operator would clock your transmission at — accounting for all the extra spacing you have added. Beginners: this number is what matters for your licence exam.
At the bottom of the Timing section is a scrolling waveform canvas displaying the Morse pattern for the sample phrase ARIS VVV. Each bar represents one transmitted element — tall bars are dahs, short bars are dits.
This timeline redraws every time you change the speed sliders. It is a learning tool: you can see the visual rhythm of each letter and compare how the element widths change as you raise or lower the WPM. The label below the canvas shows which letter each cluster of bars corresponds to.
The master output level for all audio. Drag to 0 for silence or 100 for maximum level. This is independent of your system volume — you can use both together for fine control. Default is 100.
The frequency of the CW tone. Lower numbers give a deeper, darker sound; higher numbers give a lighter, more piercing tone. Most operators find 500–700 Hz the most comfortable range for extended practice sessions. The default is 520 Hz.
The Pitch slider changes both dits and dahs to the same frequency. If you want them different, use the Advanced Sound controls described below.
When the Advanced sound checkbox is ticked, a second grid appears with separate pitch sliders for dits and dahs. By default both are set to the same value as the master Pitch slider.
Setting dit pitch and dah pitch to different values creates a two-tone Morse sound — dits at a higher frequency and dahs at a lower one (or vice versa). Some learners find two-tone audio helps distinguish elements more clearly in the early stages. It also simulates the sound of some vintage transmitters.
The Variable pitch checkbox adds a small random frequency shift (±10 Hz) to every element independently. The result sounds like a slightly drifting or unstable transmitter — common with older equipment and hand-held transceivers.
Use this after you are comfortable with clean Morse. Training on slightly imperfect audio builds resilience for real on-air reception, where no two signals are identical.
Setting | What it does and when to use it |
Start-up delay (ms) | Adds a silent pause before the first dit. Default is 0. Increase this to 200–500 ms if you use Bluetooth headphones or speakers and the very first dit gets cut off — Bluetooth devices take a moment to wake up after silence. Setting 200 ms gives the audio hardware time to fully open before the signal starts. |
Download end-gap (ms) | Adds silence at the end of downloaded WAV files. Default is 1000 ms (one second). This prevents the file from cutting off abruptly. Increase it if you are chaining multiple files together in an audio editor and need more breathing room between messages. |
The Test button plays a single 0.5-second tone at the currently set pitch — without processing any input text. Use this to audition a pitch frequency before committing to it, or to verify your speaker is working correctly.
The Stop button (in the Configure modal) immediately kills the audio context. It is a hard kill — all scheduled sounds disappear instantly. Different from the main Stop button in that it also prevents any residual audio from finishing. Use this if the Test tone seems stuck, or if you want to silence all output instantly.
❓ The Help (?) button |
The small ? button in the Sound section opens a quick reference for inline command tags like <wpm 25>, <p 700>, and <BT>. See Section 10 of this guide for the complete reference. |
The Light Box is a wide black strip that appears below the main tool panel when the Light medium is enabled in the Configuration modal. During playback it flashes bright yellow for the exact duration of each dit and dah, then returns to black during silences.
💡 Timing accuracy |
The Light Box flash is synchronised to the same JavaScript scheduler as the audio. The flash duration matches the dit or dah length exactly at your current speed. There is no offset or delay between the sound and the flash — they fire from the same event. |
As you type, the tool checks every character. If you type something that cannot be transmitted in Morse code — for example a hash (#) or a pound sign (£) — that character appears in red with a wavy underline. This tells you instantly what will be skipped during playback. Prosigns like <BT> appear with a yellow background to confirm they are recognised correctly.
Tip for beginners: Start simple. Type just two or three letters — for example ‘KM’ — and press Play. Listen carefully and try to hear the rhythm of each letter. K is dah-dit-dah. M is dah-dah. Once you can hear the difference, add more letters one at a time.
Six buttons sit directly below the text input. Here is what each one does:
Button | Shortcut | What it does |
▶ Play | Space or Enter | Starts playback from the beginning of your text. If the audio context was suspended (common on mobile), this also wakes it up. Always start here. |
⏸ Pause | Space (while playing) | Freezes playback at exactly the current position. The audio stops immediately. Press Pause again (or Space) to resume from exactly where you left off. |
⏹ Stop | — | Completely halts playback and disposes of the audio engine. All scheduled sounds are cancelled. Use this when you want to start again from the beginning. |
🔁 Repeat | — | Toggles infinite loop mode. When active the button turns green. After the final character plays, the tool waits briefly then plays the entire message again. Press Repeat again to turn looping off. |
⬇ Download WAV | — | Renders the entire message as a WAV audio file and downloads it to your device. See Section 9 for full details. |
⚙ Configure | — | Opens the Configuration modal, which contains all timing, pitch, and output settings. Close the modal to save your settings automatically. |
The History section at the bottom of the main panel is a personal library of messages you have practised. It persists between browser sessions using your browser’s local storage — close the page and it is still there when you return.
Click the green Save button next to the History heading. The current text in the input box is saved as a new history tile. Up to 20 messages are stored. When you exceed 20, the oldest entry is automatically removed to make room.
Each saved message appears as a dark blue card showing the first 30 characters of the text. Below that, every word in the message is shown as a small green button.
Click the red Clear button to erase all saved messages from local storage. This cannot be undone. History is stored per browser per device — it does not sync between your phone and your computer.
💾 Tip: Create a weekly drill set |
Each practice session, save 5-10 messages covering the characters you are currently studying. They remain available every day without re-typing. When you progress to a new lesson, clear the old history and save a fresh set of messages for the new characters. |
Clicking Download WAV renders your entire message as a standard WAV audio file and saves it directly to your device. The rendering happens entirely in your browser — no server is involved and no data is uploaded anywhere.
What the WAV file contains
What to do with the WAV file
🔉 File naming |
The file is always saved as cw_message.wav. If you download multiple messages, rename each one immediately so they do not overwrite each other. A good naming convention is the message content — for example ‘cq_de_w1aw.wav’ or ‘lesson01_km.wav’. |
The CW Generator supports two types of special tags that you can type directly into the input box. Both are enclosed in angle brackets < >.
Prosigns are procedural signals used in real radio communication. They are transmitted as a single unbroken character — no inter-element space between the constituent letters. In the input box, prosigns appear highlighted in yellow to confirm they are recognised.
Prosign | Meaning | When to use it |
<AA> | New line | Used between address lines in radiogram format. |
<AR> | End of message | Sent at the end of a transmission. The equivalent of ‘over and out’. |
<AS> | Wait | Signals a brief pause — equivalent to ‘stand by’. |
<BT> | Break / new paragraph | Separates the preamble from the message body. Very common in QSO practice. |
<CL> | Closing down | Indicates the station is closing. Sent before going off the air. |
<CT> | Start copying | Sent at the very beginning of a transmission to alert the receiving station. |
<KN> | Invitation to specific station | Over to the specific station only — not a general invitation. |
<SK> | End of contact | Sent at the very end of a QSO. ‘Silent key’ — the contact is complete. |
<SOS> | Distress signal | The international emergency signal. Transmitted as a continuous run with no spaces. |
<VE> | Understood | Acknowledgement that the previous transmission was received correctly. |
Inline commands let you change settings mid-message, giving different parts of your text different speeds or pitches. They are processed as instructions, not as transmitted Morse.
Command | Example | Effect |
<wpm N> | <wpm 25> | Changes character speed to N WPM from this point in the message. |
<farnsworth N> | <farnsworth 10> | Changes Farnsworth speed to N WPM from this point. |
<p N> | <p 700> | Changes the pitch to N Hz from this point. |
<volume N> | <volume 50> | Changes volume to N percent from this point. |
<space N> | <space 200> | Inserts N milliseconds of extra silence at this point. |
<ratio N> | <ratio 3.5> | Changes the dah-to-dit ratio (default is 3). |
<ichar N> | <ichar 5> | Changes inter-character gap to N dits. |
<iword N> | <iword 9> | Changes inter-word gap to N dits. |
🔬 Practical example |
Type: CQ CQ <wpm 25> DE <wpm 15> W1AW W1AW K This sends CQ CQ at 25 WPM, then drops to 15 WPM for the callsign. Useful for simulating an experienced operator calling CQ slowly for beginners. |
These shortcuts work whenever the keyboard focus is anywhere on the page (not inside the text input box):
Key | Action |
Space | Play — starts playback from the beginning of the message. |
Enter | Play — identical to Space. Useful when typing on a number pad. |
V or v | Clears the input box, types ‘VVV’, and immediately plays it. VVV is the standard CW test signal — three Vs followed by silence. Use this to quickly test your audio settings. |
Note on keyboard focus
If you have clicked inside the text input box (the CW input area), keyboard shortcuts are temporarily disabled so you can type freely. Click anywhere outside the text box to restore shortcut functionality. Pressing Escape also moves focus away from the input. |
Each week, type the 20 most common QSO phrases you are currently learning (CQ, 73, RST 599, QTH, OP) and download each as a WAV file. Combine them in Audacity to make a single 10-minute practice track. Transfer it to your phone. Listen during your commute every day. You will be surprised how much retention this passive listening builds.
Select just one or two characters — for example, type ‘K K K K K’ five times in the input box. Enable Repeat mode (button turns green). Press Play and let it loop. Do not try to copy it consciously — just let the sound enter your ears while you do something else. After 10 minutes, the rhythm of K becomes automatic.
Callsign pile-ups in contest operation mix fast and slow operators. Simulate this by building a message like: <wpm 30> W1AW <wpm 18> K6RB <wpm 25> VK2ZZZ <wpm 15> JA1ZZZ. Each callsign is sent at a different speed, forcing your brain to adapt quickly — exactly what happens in real operation.
Once you can comfortably receive at your target speed with Computer (perfect) timing, switch to Human (jitter) mode for one week. The slight timing imperfections feel surprisingly different at first, but your brain adapts within a few sessions. After this, copying real on-air signals feels much more natural.
If you are struggling to distinguish dits from dahs — they can blur together at higher speeds — try setting Dit pitch to 600 Hz and Dah pitch to 450 Hz in Advanced Sound. The lower pitch of the dah makes it sound ‘heavier’ and distinctly different. Some learners use this for a few weeks and then gradually converge both pitches back to the same frequency as they develop confidence.
Press V on your keyboard at any time to instantly play VVV — the standard CW test signal. This is the fastest way to check that your audio is working, your pitch is comfortable, and your timing settings are what you expect. Used by operators worldwide as a standard ‘is this thing on?’ signal.
Find answers to common questions about Morse code and how to use our CW Generator effectively
Check the following in order: (1) Is your system volume turned up? (2) Is the Sound medium enabled in the Configuration modal? The Sound toggle must be highlighted. (3) On iPhone and iPad, iOS blocks Web Audio until a direct user tap occurs — pressing Play should trigger it, but if not, tap directly on the Play button (not just the keyboard). (4) Check that your Silent Mode switch is not active on iPhone. (5) Try the Test button in the Sound section of Configure to verify audio output independently of the input text.
This is almost always a Bluetooth headphone or speaker issue. Wireless audio devices go into a sleep state after a few seconds of silence and need a brief moment to wake up. Open Configure, go to the Sound section, and set the Start-up delay to 200 ms. If the cut-off persists, increase it to 400 ms. The tool adds that much silence before the first tone, giving the device time to fully activate.
Yes. Settings are automatically saved to your browser’s local storage when you close the Configuration modal. They persist across sessions as long as you use the same browser on the same device. If you clear your browser data, the settings will reset to defaults. The History section is also stored in local storage and persists between sessions.
Character Speed controls how fast the dots and dashes within a single letter are transmitted. Farnsworth Speed controls how long the pauses between letters are. Set Character Speed high (20 WPM) and Farnsworth Speed low (5 WPM) to hear fast characters with slow, generous gaps between them. This is the Farnsworth method — the most effective technique for building CW speed. Gradually increase Farnsworth Speed until it matches Character Speed to reach your full target WPM.
The audio synthesis and all playback features work with no internet connection once the page has loaded. The only things that require internet are the initial page load (to fetch the tool’s code and fonts) and text-to-speech voices on some devices. Save the page to your browser’s history and it will load quickly even with a slow connection. The WAV download feature works fully offline.
Unsupported characters are highlighted in red with a wavy underline in the text input box as you type. During playback they are simply skipped — the tool moves on to the next valid character without error. This means your text will transmit correctly but without the unsupported character. Common characters that are NOT in standard Morse code include: most currency symbols, emoji, accented letters (though some national variants exist), and many special typographic marks.
A prosign is a pair of letters transmitted as a single character — the inter-element gap between the two letters is removed. For example, <AR> is A followed immediately by R, sounding like dit-dah-dit-dah-dit as one unbroken sound rather than two separate letters. In the input box, prosigns appear with a yellow background when recognised correctly. They must be enclosed in angle brackets exactly as shown — <AR>, not AR or (AR).
No. The only storage this tool uses is your own browser’s local storage (for History and Settings). No text, audio, or personal data is ever sent to any server. The tool operates entirely in your browser. Clearing your browser data removes everything the tool has stored.
Specification | Detail |
Audio engine | Web Audio API — OscillatorNode for real-time synthesis. No pre-recorded files. Zero latency from keystroke to sound. |
WAV export | OfflineAudioContext rendering. 44,100 Hz sample rate, 16-bit PCM, mono. Standard WAV format. |
Timing standard | ITU-R M.1677-1. Formula: dit length = 1200 / WPM milliseconds. |
Character set | All 26 letters, digits 0–9, and standard punctuation per ITU Morse code table. All prosigns from the standard list. |
Browser support | Chrome 80+, Edge 80+, Firefox 75+, Safari 14+, Opera. Any browser with Web Audio API support. |
Mobile support | Fully responsive on iOS and Android. Vibration on supported Android devices. iOS audio requires a user tap to initialise. |
Storage | Browser localStorage only. No cookies. No server storage. No analytics. |
Privacy | Zero data collection. No tracking. No account. No personal data leaves the browser. |
Code | Vanilla JavaScript, no frameworks or dependencies. Self-contained single-file widget. |
Enhance your learning experience by exploring additional tools available on InMorseCode, including:
Internal tools work together to build a complete Morse code learning ecosystem.