A Morse code bracelet is a beaded bracelet where the dot-dash pattern of a name, word, or phrase is encoded using two types of beads — small round beads for dots and longer tube or cylinder beads for dashes. The result is a piece of jewellery that looks elegant and minimalist but carries a hidden personal message that can be decoded by anyone who knows Morse code.
Morse code bracelets are popular birthday gifts, friendship tokens, anniversary presents, and personalised accessories. They are also genuinely straightforward to make — no specialist jewellery skills are required. This step-by-step guide walks you through everything from choosing your message to threading the final clasp.
What You Need to Make a Morse Code Bracelet
Materials
- Small round beads — for dots. Size 6mm or 8mm. One colour.
- Tube or cylinder beads — for dashes. Size 4×12mm or similar (3× the dot bead length). Same or contrasting colour.
- Spacer beads — small neutral beads or slight gaps between letter groups to separate them.
- Stringing material — beading cord, elastic cord, or wire. Elastic is easiest for beginners.
- Clasp — lobster clasp and jump ring, OR just tie the elastic if using stretch cord.
- Scissors and bead board (optional but helpful for layout before threading).
Tools
- Round-nose pliers (for wire bracelets)
- Beading needle (for thin cord)
- Ruler or tape measure
- Notebook and pen for planning your bead sequence
Step 1: Choose Your Message and Generate the Morse Code
Decide what message your bracelet will encode. Popular choices include names, short words (LOVE, HOPE, BRAVE), phrases (I LOVE YOU), and significant dates.
Once you have chosen your message, type it into the InMorseCode Morse Code Translator. The tool instantly shows you the dot-dash sequence for each letter. Write this down carefully or print it out — this is your bead pattern blueprint.
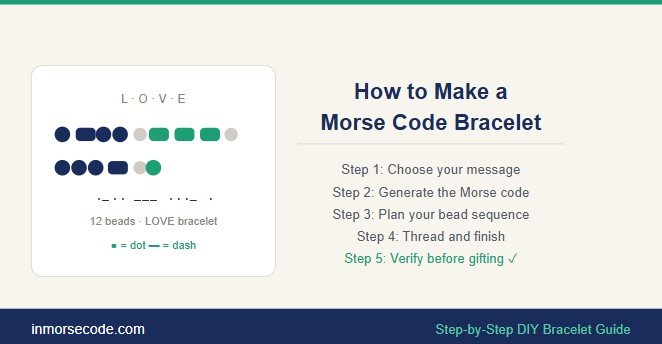
Example — the word LOVE:
| LOVE ·−·· −−− ···− · |
| Letter | Morse Code | Sound |
| L | · − · · | dot tube dot dot = 4 beads |
| O | − − − | tube tube tube = 3 beads |
| V | · · · − | dot dot dot tube = 4 beads |
| E | · | dot = 1 bead |
Total for LOVE: 12 code beads + 3 spacers between letters.
| Listen before you bead: Press Play on the InMorseCode translator to hear your message as Morse audio. This helps you catch any errors in your written-down pattern before you start threading beads. |
Step 2: Plan Your Bead Layout
Before threading a single bead, lay out your entire sequence on a bead board or flat surface. Use:
- Small round beads = dots (·)
- Tube/cylinder beads = dashes (−)
- Spacer beads or small gaps = letter boundaries
Reading from left to right, your bead layout represents the Morse code of your message left to right. Double-check your layout against your printed blueprint before continuing.
Decide your bracelet length: standard women’s bracelets are 6.5–7.5 inches. Men’s bracelets are 7.5–8.5 inches. Measure your wrist and add 0.5 inches for comfort.
Step 3: Choose Your Colour Scheme
The visual impact of your bracelet depends heavily on bead colour. Common approaches:
- Same colour for dots and dashes — most minimalist. The pattern is subtle and the beads blend. Best for personal wear.
- Two contrasting colours — one colour for dots, one for dashes. Makes the Morse pattern pop visually. Great for gifts.
- Gradient or jewel tones — mixing warm birthstone colours adds personal meaning (birthstones for birth months or anniversary stones).
- Gold/silver metallic — elegant and versatile. Metallic tube beads against matte round beads creates a refined look.
Step 4: Thread the Bracelet
- Cut your cord to wrist size + 6 inches extra for knotting and the clasp.
- If using elastic, double the cord for strength and thread both strands together.
- Thread your beads in exact sequence from your layout plan: dot beads (small round) and dash beads (tube), with spacers at letter boundaries.
- Check your sequence against the blueprint after every 3–4 characters. It is far easier to correct threading at this stage than after completion.
- Continue threading until all letters of your message are beaded. Add a few neutral filler beads at each end if needed to reach your target length.
Step 5: Finish and Secure
How you finish the bracelet depends on your stringing material:
Elastic cord finish:
- Pull the two ends together snugly.
- Tie a surgeon’s knot (square knot with an extra loop) three times. Pull firmly.
- Add a small drop of jewellery glue to the knot if desired.
- Trim ends to 1–2mm and tuck the knot inside the nearest bead.
Beading wire with clasp:
- Thread a crimp bead onto the wire, then through the jump ring of a lobster clasp, then back through the crimp bead.
- Use flat-nose pliers to crimp firmly.
- Repeat at the other end with a simple jump ring or extender chain.
Step 6: Verify the Finished Bracelet
This step is especially important for gift bracelets where accuracy matters. Photograph your finished bracelet laid flat on a white background and upload the photo to the InMorseCode Image to Morse tool in ‘Morse Code in Image’ mode. The tool will attempt to decode the bead pattern back to text.
If the decoded output matches your intended message — the bracelet is correct. If it doesn’t — recheck the sequence against your blueprint and identify where the error occurred.
| Why verification matters: A bracelet with a wrong letter in someone’s name is an unfortunate gift. The image-upload verification takes 30 seconds and catches errors that are impossible to spot by eye after threading. |
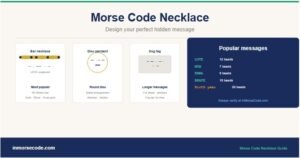
Popular Messages for Morse Code Bracelets
| Letter | Morse Code | Sound |
| LOVE | ·−·· −−− ···− · | 12 beads |
| HOPE | ···· −−− ·−·· · | 12 beads |
| BRAVE | −··· ·−· ·− ···− · | 15 beads |
| SISTER | ··· ·· ··· − · − ·−· | 20 beads |
| FAMILY | ··−· ·− −− ·· ·−·· −·−− | 22 beads |
| I LOVE YOU | ·· ·−·· −−− ···− · −·−− −−− ··− | 27 beads (word gap between words) |
Morse Code Bracelet as a Gift
A Morse code bracelet is a highly personal gift because the recipient knows that someone took the time to translate a specific message, plan the bead sequence, and create something unique for them. Some popular gift scenarios:
- Mother’s Day: Encode ‘MUM’, ‘I LOVE YOU’, or all your children’s names
- Birthday: Encode the recipient’s name or birth year
- Friendship: Matching ‘BEST’ and ‘FRIEND’ bracelets for two people
- Anniversary: Encode the wedding date or anniversary year
- New baby: Encode the baby’s name — a keepsake gift for the parents
Frequently Asked Questions: Morse Code Bracelets
What size beads should I use for dots vs dashes?
The key rule is that a dash should be approximately 3 times the length of a dot — matching the ITU timing ratio. Common sizes: 6mm round beads for dots and 4×18mm tube beads for dashes. Or 8mm round for dots and 5×24mm tube for dashes. The exact sizes do not matter as long as the 1:3 length ratio is visually clear.
How long does it take to make a Morse code bracelet?
For a beginner, plan 1–2 hours for a short name bracelet. This includes generating the code, planning the layout, threading, and finishing. With practice and preparation, 30–45 minutes is achievable for medium-length messages.
Can I make a Morse code bracelet without knowing Morse code?
Yes — that is exactly what the InMorseCode.com translator is for. Type your message, read the output, and convert dots to small round beads and dashes to tube beads. You do not need to memorise the code to make an accurate bracelet.
How do I keep track of letter boundaries in the beads?
Use spacer beads — small neutral beads placed between letter groups. Alternatively, use a slightly longer gap in the threading. Without letter separators, the bracelet looks cleaner but is harder to decode. For gift bracelets where decodability matters, include visible spacers.
What is the best material for the bracelet cord?
For beginners, elastic beading cord (0.8–1mm) is easiest because it stretches over the hand without a clasp. For a more professional finish, use fine beading wire with crimp beads and a lobster clasp. Silk thread and nylon thread are also used for more delicate designs.